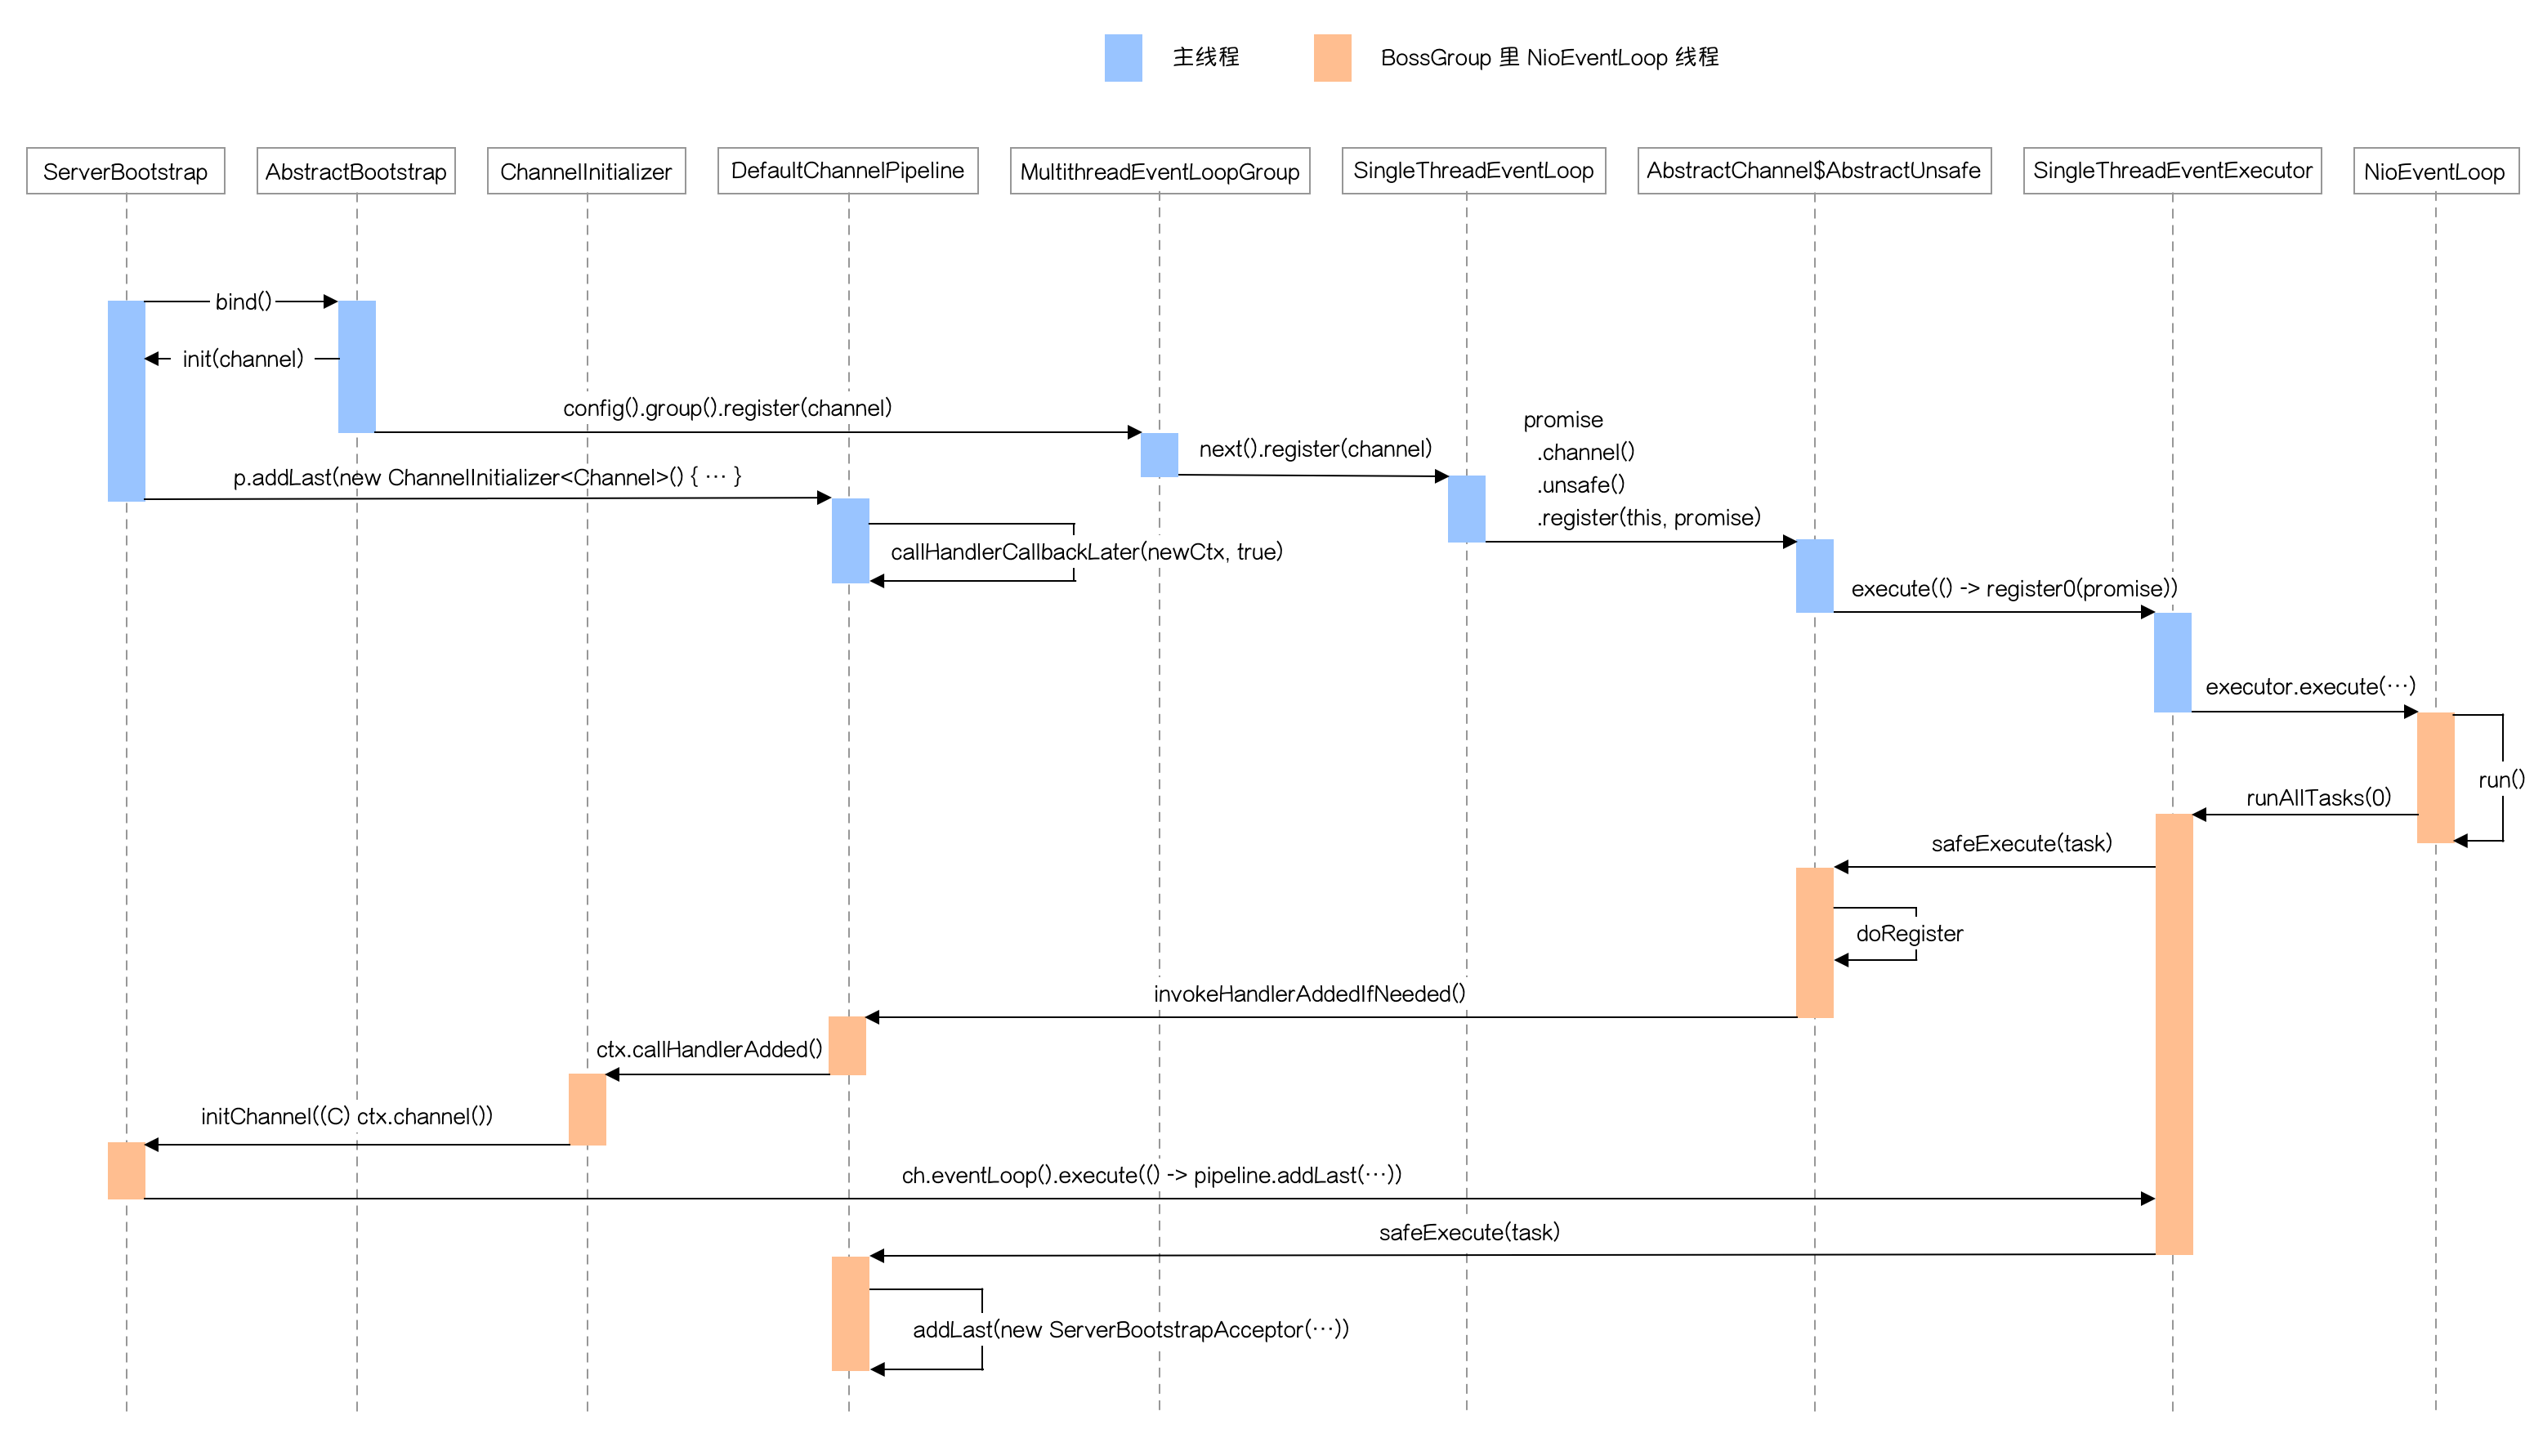
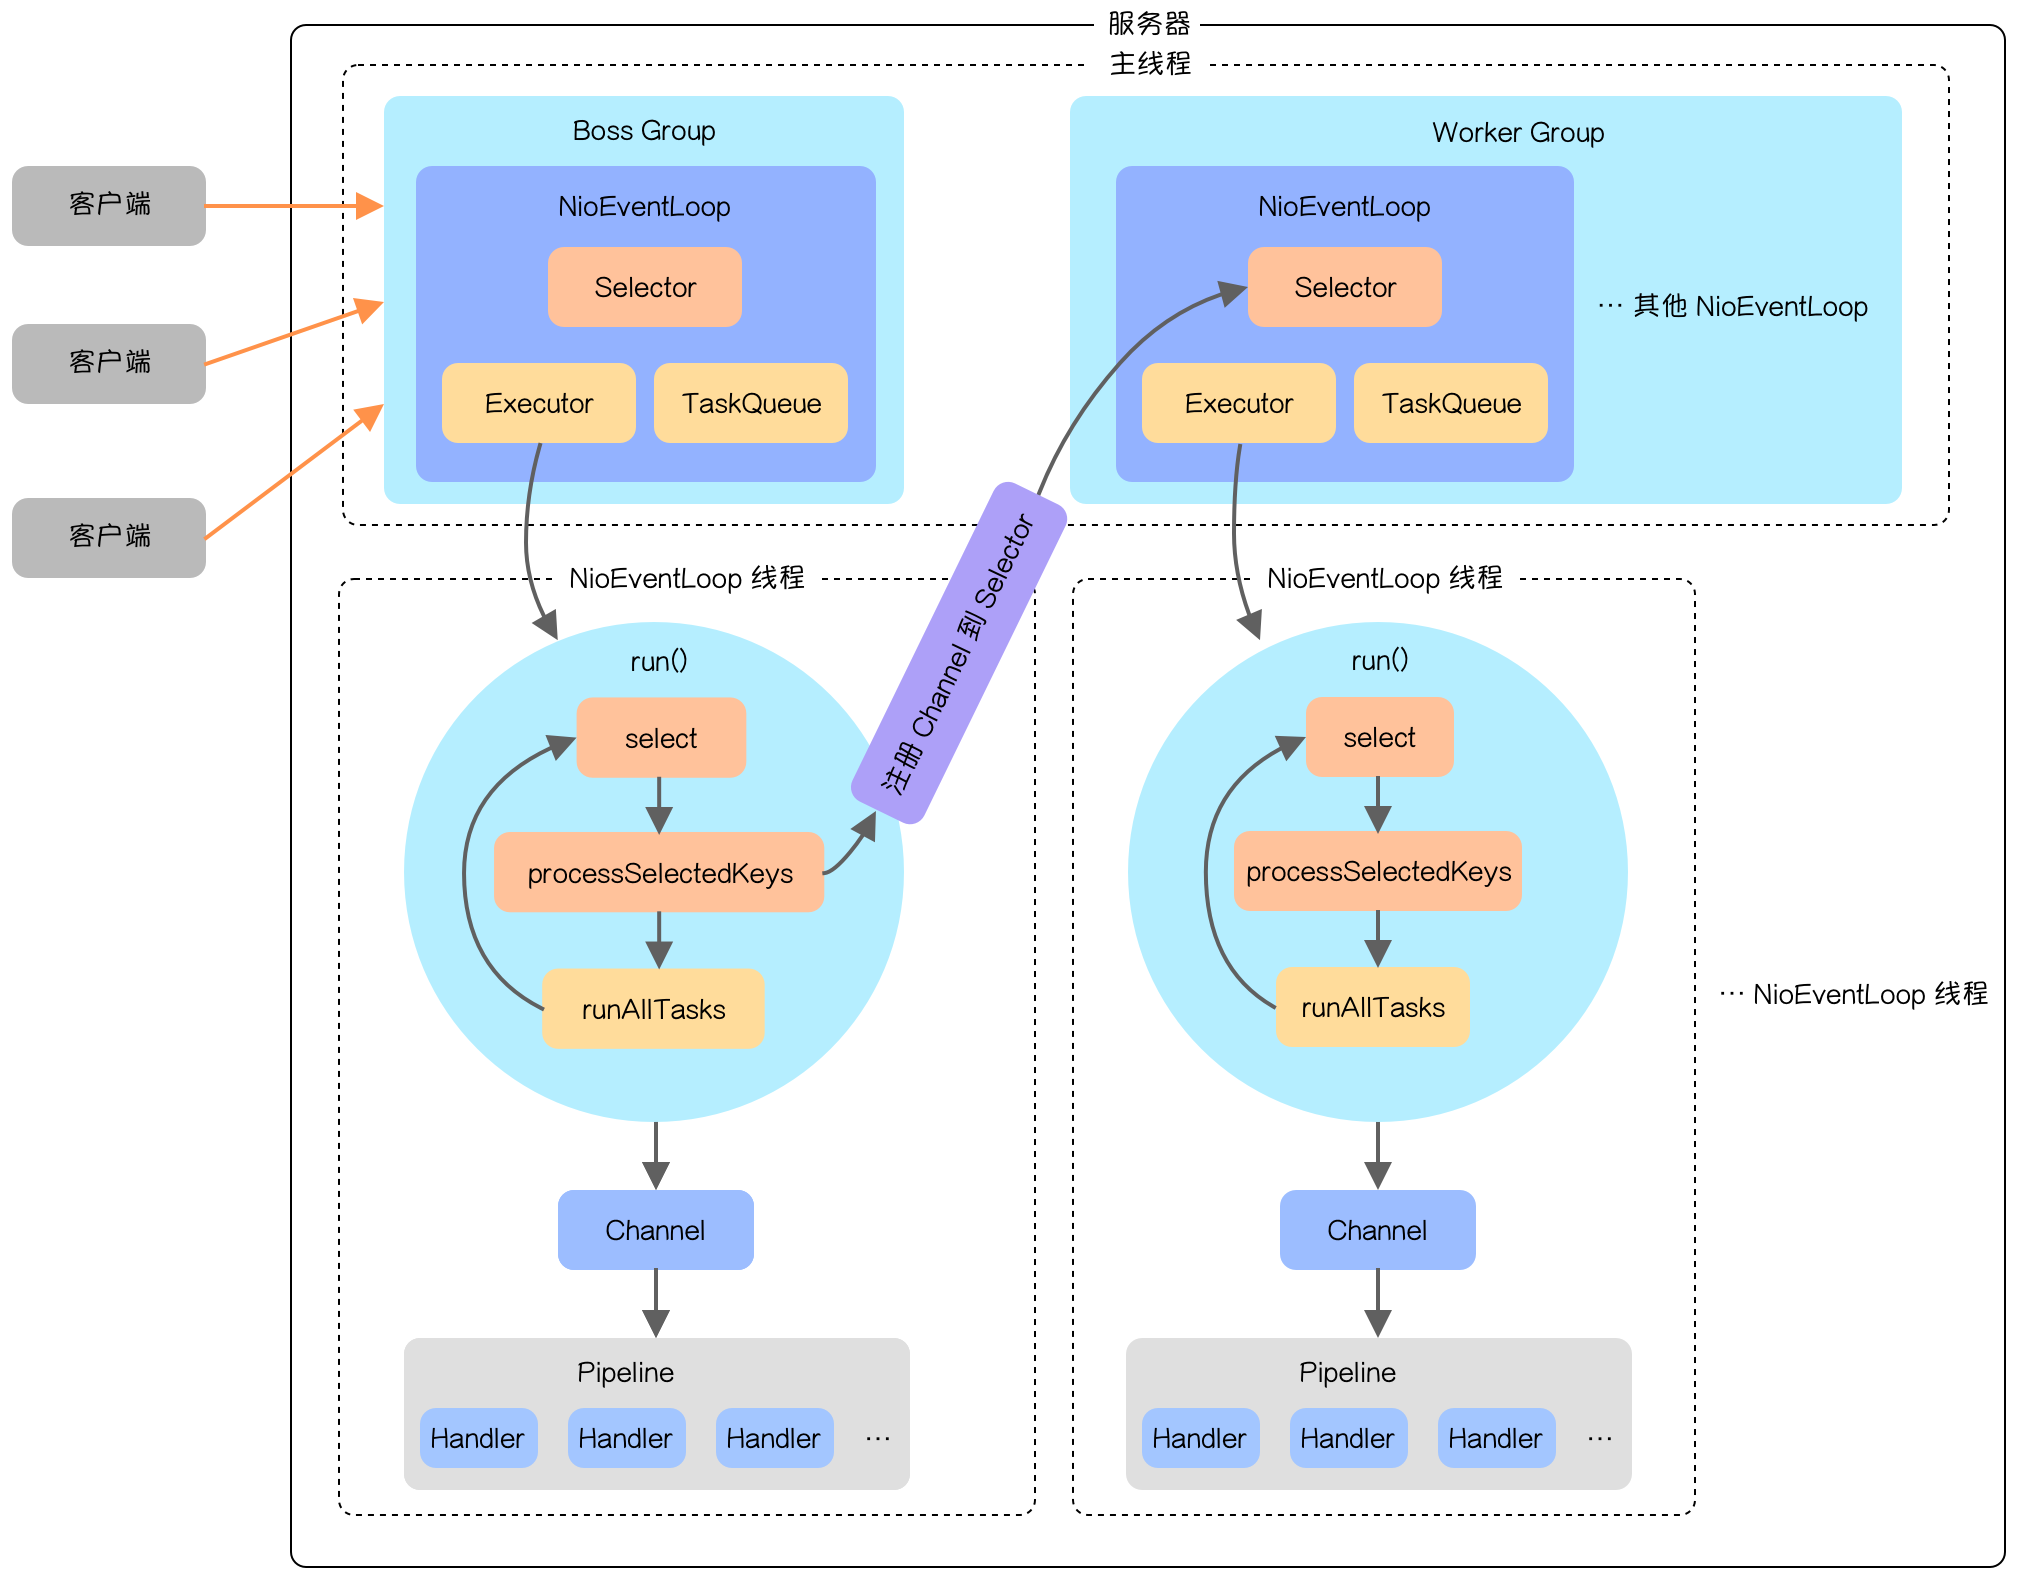
上一篇文章多图详解 Netty 把 Netty 编程所需的知识点详细讲了一遍,从文章中也可以看出 Netty 的组件比较多,使用的灵活性也比较大,如果对组件不熟悉一不注意就会掉坑里。Netty 编程几乎所有的问题其实都可以从源码中找到答案,下面我们就来深入了解一下 Netty 的源码。

Netty 的服务器与客户端源码都是差不多的,而且服务器要相对复杂一点,因此本篇源码解析主要针对服务器。

下面是本次源码解析使用到的示例代码。

服务器端:

1
2
3
4
5
6
7
8
9
10
11
12
13
14
15
16
17
18
19
20
21
22
23
24
25
26
27
public class NettyServer {

public static void main(String[] args) throws InterruptedException {
EventLoopGroup bossGroup = new NioEventLoopGroup(1);
EventLoopGroup workerGroup = new NioEventLoopGroup();
ServerBootstrap bootstrap = new ServerBootstrap();
bootstrap.group(bossGroup, workerGroup)
.channel(NioServerSocketChannel.class)
.option(ChannelOption.SO_BACKLOG, 128)
.childOption(ChannelOption.SO_KEEPALIVE, Boolean.TRUE)
.childHandler(new ChannelInitializer<SocketChannel>() {
@Override
protected void initChannel(SocketChannel socketChannel) throws Exception {
socketChannel.pipeline().addLast(new NettyServerFirstOutboundHandler());
socketChannel.pipeline().addLast(new NettyServerSecondOutboundHandler());
socketChannel.pipeline().addLast(new NettyServerFirstInboundHandler());
socketChannel.pipeline().addLast(new NettyServerSecondInboundHandler());
}
});
// 绑定端口号,同时也会启动通道初始化和注册
ChannelFuture channelFuture = bootstrap.bind(new InetSocketAddress(9999)).sync();
channelFuture.channel().closeFuture().sync();
bossGroup.shutdownGracefully();
workerGroup.shutdownGracefully();
}

}

客户端:

1
2
3
4
5
6
7
8
9
10
11
12
13
14
15
16
17
18
19
20
21
22
23
24
25
public class NettyClient {

public static void main(String[] args) throws InterruptedException {
EventLoopGroup eventLoopGroup = new NioEventLoopGroup(1);
Bootstrap bootstrap = new Bootstrap();
bootstrap.group(eventLoopGroup)
.channel(NioSocketChannel.class)
.handler(new ChannelInitializer<SocketChannel>() {
@Override
protected void initChannel(SocketChannel socketChannel) throws Exception {
socketChannel.pipeline().addLast(new NettyClientHandler());
}
});
ChannelFuture channelFuture = bootstrap.connect(new InetSocketAddress("127.0.0.1", 9999)).sync();
System.out.println("客户端启动成功!");
Channel channel = channelFuture.channel();
Scanner scanner = new Scanner(System.in);
while (scanner.hasNextLine()) {
channel.writeAndFlush(Unpooled.copiedBuffer(scanner.nextLine(), CharsetUtil.UTF_8));
}
channelFuture.channel().closeFuture().sync();
eventLoopGroup.shutdownGracefully();
}

}

服务端启动流程

Netty 启动流程只涉及到 BossGroup 相关的通道、线程及其他组件,只有连接就绪消息到来时才会涉及到 WorkerGroup 。

整个启动流程如下图所示:

整个启动流程主要做了三件事:

  • 初始化通道:init(channel)
  • 把通道注册到 Selector 上:doRegister
  • 添加连接就绪事件处理 Handler 上下文节点到 Pipeline

下面详细讲一下整个启动流程涉及到的主要方法。

ServerBootstrap 的 bind() 方法里会调用 doBind() 方法,后者的核心就是 initAndRegister() 方法,下面是方法代码:

1
2
3
4
5
6
7
8
9
10
11
12
13
14
15
16
17
18
19
20
21
22
23
24
25
26
27
28
29
final ChannelFuture initAndRegister() {
Channel channel = null;
try {
// 创建通道
channel = channelFactory.newChannel();
// 初始化通道
init(channel);
} catch (Throwable t) {
if (channel != null) {
// channel can be null if newChannel crashed (eg SocketException("too many open files"))
channel.unsafe().closeForcibly();
// as the Channel is not registered yet we need to force the usage of the GlobalEventExecutor
return new DefaultChannelPromise(channel, GlobalEventExecutor.INSTANCE).setFailure(t);
}
// as the Channel is not registered yet we need to force the usage of the GlobalEventExecutor
return new DefaultChannelPromise(new FailedChannel(), GlobalEventExecutor.INSTANCE).setFailure(t);
}
// 注册通道
ChannelFuture regFuture = config().group().register(channel);
if (regFuture.cause() != null) {
if (channel.isRegistered()) {
channel.close();
} else {
channel.unsafe().closeForcibly();
}
}

return regFuture;
}

这个方法就像方法名描述的一样,主要做了通道初始化和注册通道两件事。

通道初始化

下面是通道初始化的代码:

1
2
3
4
5
6
7
8
9
10
11
12
13
14
15
16
17
18
19
20
21
22
23
24
25
26
27
28
29
30
31
32
@Override
void init(Channel channel) {
setChannelOptions(channel, newOptionsArray(), logger);
setAttributes(channel, newAttributesArray());
// 得到通道 pipeline
ChannelPipeline p = channel.pipeline();
// 赋值 workGroup 与 服务端 handler
final EventLoopGroup currentChildGroup = childGroup;
final ChannelHandler currentChildHandler = childHandler;
final Entry<ChannelOption<?>, Object>[] currentChildOptions = newOptionsArray(childOptions);
final Entry<AttributeKey<?>, Object>[] currentChildAttrs = newAttributesArray(childAttrs);
// 添加通道初始化 handler
p.addLast(new ChannelInitializer<Channel>() {
@Override
public void initChannel(final Channel ch) {
final ChannelPipeline pipeline = ch.pipeline();
ChannelHandler handler = config.handler();
if (handler != null) {
pipeline.addLast(handler);
}

ch.eventLoop().execute(new Runnable() {
@Override
public void run() {
// 在 initChannel 方法中添加 ServerBootstrapAcceptor 的 handler
pipeline.addLast(new ServerBootstrapAcceptor(
ch, currentChildGroup, currentChildHandler, currentChildOptions, currentChildAttrs));
}
});
}
});
}

这个方法的核心是 p.addLast(new ChannelInitializer<Channel>() {...}) ,这个方法在 Bossgroup 的 Channel 的 Pipeline 中添加了一个 ChannelInitializer 类型的 Handler 。

这里需要注意的是,一切在通道注册之前添加的 Handler 都会由 pendingHandlerCallbackHead 指针指向它,在通道注册完之后会调用这个 Hander 并从 pipeline 中移除。换句话说 ChannelInitializer 类主要是做通道注册完之后的一些初始化工作。

通道注册

通道注册的代码有点绕,主要是涉及到两个线程,最终注册是在 NioEventLoop 线程中进行的。

config().group().register(channel) 方法会调用 MultithreadEventLoopGroup (也就是我们创建的 BossGroup 的父类)的 register() 方法,方法源码如下:

1
2
3
4
@Override
public ChannelFuture register(Channel channel) {
return next().register(channel);
}

next() 方法会在 BossGroup 的 children 里轮询返回 NioEventLoop,不过我们一般创建的 BossGroup 都是单线程的,只对应一个 NioEventLoop。

找到 NioEventLoop 之后会调用它的 register() 方法。这里会调用它的父类 SingleThreadEventLoop 的 register() 方法,里面涉及内部调用,这里只列出主要那个。代码如下:

1
2
3
4
5
6
@Override
public ChannelFuture register(final ChannelPromise promise) {
ObjectUtil.checkNotNull(promise, "promise");
promise.channel().unsafe().register(this, promise);
return promise;
}

这个方法会调用 AbstractChannel 的内部类 AbstractUnsafe 的 register() 方法,代码如下:

1
2
3
4
5
6
7
8
9
10
11
12
13
14
15
16
17
18
19
20
21
22
23
24
25
26
27
28
29
30
31
32
33
34
35
36
37
@Override
public final void register(EventLoop eventLoop, final ChannelPromise promise) {
ObjectUtil.checkNotNull(eventLoop, "eventLoop");
if (isRegistered()) {
promise.setFailure(new IllegalStateException("registered to an event loop already"));
return;
}
if (!isCompatible(eventLoop)) {
promise.setFailure(
new IllegalStateException("incompatible event loop type: " + eventLoop.getClass().getName()));
return;
}

AbstractChannel.this.eventLoop = eventLoop;

if (eventLoop.inEventLoop()) {
register0(promise);
} else {
try {
// 执行 NioEventLoop 的 execute() 方法
eventLoop.execute(new Runnable() {
@Override
public void run() {
// 注册通道
register0(promise);
}
});
} catch (Throwable t) {
logger.warn(
"Force-closing a channel whose registration task was not accepted by an event loop: {}",
AbstractChannel.this, t);
closeForcibly();
closeFuture.setClosed();
safeSetFailure(promise, t);
}
}
}

这个方法重点是添加了注释那两句 eventLoop.execute(new Runnable() {...})register0(promise)。前面这句会调用 SingleThreadEventExecutor 的 execute() ,这个方法会把传入的 Runable 作为 task 添加到 taskQueue 中,如果 NioEventLoop 线程没启动会等线程启动后在 NioEventLoop 线程中执行这个 task。

下面重点看看 SingleThreadEventExecutor 的 execute() 方法是怎么启动线程的:

1
2
3
4
5
6
7
8
9
10
11
12
13
14
15
16
17
18
19
20
21
22
23
24
25
26
27
28
private void execute(Runnable task, boolean immediate) {
boolean inEventLoop = inEventLoop();
// 添加任务到队列
addTask(task);
if (!inEventLoop) {
// 启动线程
startThread();
if (isShutdown()) {
boolean reject = false;
try {
if (removeTask(task)) {
reject = true;
}
} catch (UnsupportedOperationException e) {
// The task queue does not support removal so the best thing we can do is to just move on and
// hope we will be able to pick-up the task before its completely terminated.
// In worst case we will log on termination.
}
if (reject) {
reject();
}
}
}

if (!addTaskWakesUp && immediate) {
wakeup(inEventLoop);
}
}
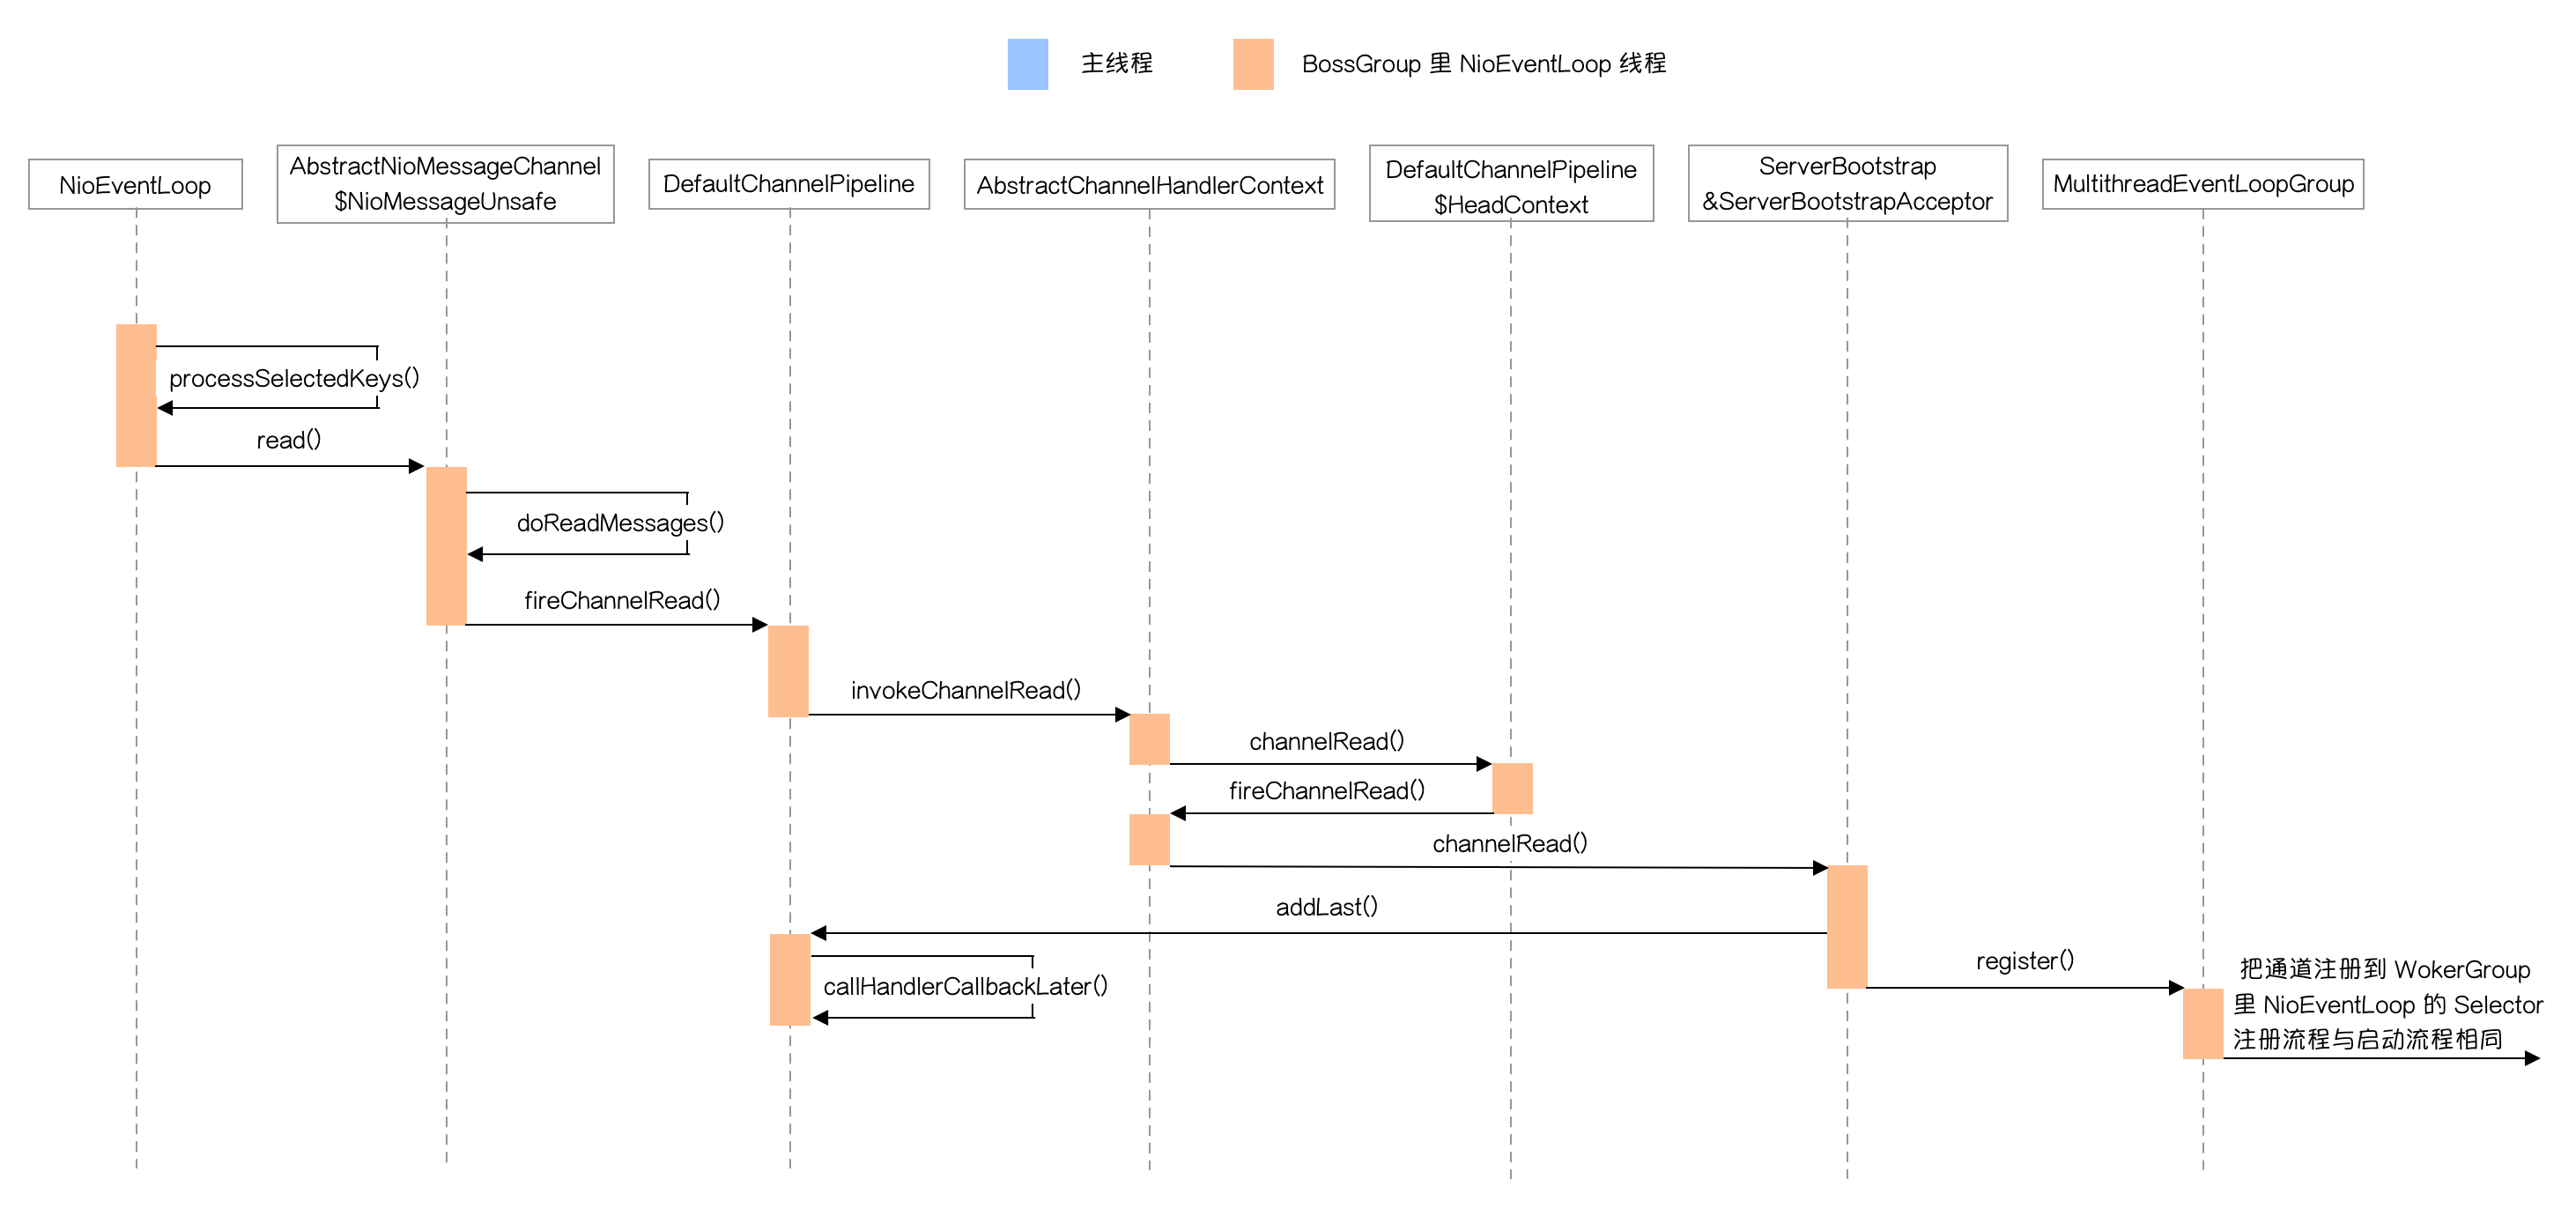
这个方法重点做了两件事,一是把之前传入的 Runnable 作为 task 添加到 taskQueue 中,第二件事就是启动线程。

启动线程有很多中间过程调用,下面重点看真正执行启动线程的方法:

1
2
3
4
5
6
7
8
9
10
11
12
13
14
15
16
17
18
19
20
21
22
23
24
private void doStartThread() {
assert thread == null;
executor.execute(new Runnable() {
@Override
public void run() {
thread = Thread.currentThread();
if (interrupted) {
thread.interrupt();
}

boolean success = false;
updateLastExecutionTime();
try {
// 执行 NioEventLoop 的 run() 方法
SingleThreadEventExecutor.this.run();
success = true;
} catch (Throwable t) {
logger.warn("Unexpected exception from an event executor: ", t);
} finally {
...
}
}
});
}

这个方法里的重点就一个 SingleThreadEventExecutor.this.run()。 这个方法调用了子类的 run() 方法,而这个方法就是 Netty 最重要的事件循环方法。

下面就是这个方法的源码:

1
2
3
4
5
6
7
8
9
10
11
12
13
14
15
16
17
18
19
20
21
22
23
24
25
26
27
28
29
30
31
32
33
34
35
36
37
38
39
40
41
42
43
44
45
46
47
48
49
50
51
52
53
54
55
56
57
58
59
60
61
62
63
64
65
66
67
68
69
70
71
72
73
74
75
76
77
78
79
80
81
82
83
84
85
86
87
88
89
90
91
92
93
94
95
96
97
98
99
100
101
102
103
104
105
106
107
108
109
@Override
protected void run() {
int selectCnt = 0;
for (;;) {
try {
int strategy;
try {
// 根据 taskQueue 是否为空决定 select 的策略
strategy = selectStrategy.calculateStrategy(selectNowSupplier, hasTasks());
switch (strategy) {
case SelectStrategy.CONTINUE:
continue;

case SelectStrategy.BUSY_WAIT:
// fall-through to SELECT since the busy-wait is not supported with NIO

case SelectStrategy.SELECT:
long curDeadlineNanos = nextScheduledTaskDeadlineNanos();
if (curDeadlineNanos == -1L) {
curDeadlineNanos = NONE; // nothing on the calendar
}
nextWakeupNanos.set(curDeadlineNanos);
try {
if (!hasTasks()) {
// 如果没有任务需要执行,调用 select 方法阻塞并监听就绪事件
strategy = select(curDeadlineNanos);
}
} finally {
// This update is just to help block unnecessary selector wakeups
// so use of lazySet is ok (no race condition)
nextWakeupNanos.lazySet(AWAKE);
}
// fall through
default:
}
} catch (IOException e) {
// If we receive an IOException here its because the Selector is messed up. Let's rebuild
// the selector and retry. https://github.com/netty/netty/issues/8566
rebuildSelector0();
selectCnt = 0;
handleLoopException(e);
continue;
}

selectCnt++;
cancelledKeys = 0;
needsToSelectAgain = false;
final int ioRatio = this.ioRatio;
boolean ranTasks;
if (ioRatio == 100) {
try {
if (strategy > 0) {
processSelectedKeys();
}
} finally {
// Ensure we always run tasks.
ranTasks = runAllTasks();
}
} else if (strategy > 0) {
final long ioStartTime = System.nanoTime();
try {
// 处理 Selector 监听到的就绪事件
processSelectedKeys();
} finally {
// Ensure we always run tasks.
final long ioTime = System.nanoTime() - ioStartTime;
ranTasks = runAllTasks(ioTime * (100 - ioRatio) / ioRatio);
}
} else {
// 执行 taskQueue 里面所有的 task ,不保证能全部执行完
ranTasks = runAllTasks(0); // This will run the minimum number of tasks
}

if (ranTasks || strategy > 0) {
if (selectCnt > MIN_PREMATURE_SELECTOR_RETURNS && logger.isDebugEnabled()) {
logger.debug("Selector.select() returned prematurely {} times in a row for Selector {}.",
selectCnt - 1, selector);
}
selectCnt = 0;
} else if (unexpectedSelectorWakeup(selectCnt)) { // Unexpected wakeup (unusual case)
selectCnt = 0;
}
} catch (CancelledKeyException e) {
// Harmless exception - log anyway
if (logger.isDebugEnabled()) {
logger.debug(CancelledKeyException.class.getSimpleName() + " raised by a Selector {} - JDK bug?",
selector, e);
}
} catch (Error e) {
throw (Error) e;
} catch (Throwable t) {
handleLoopException(t);
} finally {
// Always handle shutdown even if the loop processing threw an exception.
try {
if (isShuttingDown()) {
closeAll();
if (confirmShutdown()) {
return;
}
}
} catch (Error e) {
throw (Error) e;
} catch (Throwable t) {
handleLoopException(t);
}
}
}
}

这个方法看着代码挺多,我们只看重点的这 4 个方法:

  • ```java
    // 根据 taskQueue 是否为空决定 select 的策略
    strategy = selectStrategy.calculateStrategy(selectNowSupplier, hasTasks());

    1
    2
    3
    4
    5
    6

    * ```java
    if (!hasTasks()) {
    // 如果没有任务需要执行,调用 select 方法阻塞并监听就绪事件
    strategy = select(curDeadlineNanos);
    }
  • ```java
    // 处理 Selector 监听到的就绪事件
    processSelectedKeys();

    1
    2
    3
    4

    * ```java
    // 执行 taskQueue 里面 task ,不保证能全部执行完
    ranTasks = runAllTasks(0);

由于现在是讲启动流程,当前主要涉及到第一个和第四个方法。选取 select 策略的时候由于 taskQueue 不为空,会直接调用 selectNow() 方法,这个方法不会阻塞,会直接返回是否有就绪事件,如果有就先处理就绪事件,如果没有就先处理 taskQueue 里的任务。

在当前这个阶段会直接执行 task ,这里需要执行的 task 是什么呢?就是之前 execute() 方法里传的 Runnable ,这个 Runnable 里面的核心代码就是 register0(promise) ,下面是之前 execute() 这段代码:

1
2
3
4
5
6
7
eventLoop.execute(new Runnable() {
@Override
public void run() {
// 注册通道
register0(promise);
}
});

下面是 register0(promise) 的源码:

1
2
3
4
5
6
7
8
9
10
11
12
13
14
15
16
17
18
19
20
21
22
23
24
25
26
27
28
29
30
31
32
private void register0(ChannelPromise promise) {
try {
if (!promise.setUncancellable() || !ensureOpen(promise)) {
return;
}
boolean firstRegistration = neverRegistered;
// 真正执行把通道注册到 selector
doRegister();
neverRegistered = false;
registered = true;
// 如果是第一次注册,调用 handlerAdded() 方法
pipeline.invokeHandlerAddedIfNeeded();
// 调用 FutureListener 的 success 回调方法
safeSetSuccess(promise);
// 调用通道注册方法
pipeline.fireChannelRegistered();
if (isActive()) {
if (firstRegistration) {
// 调用 channelActive 方法,如果是 autoRead 状态,还会从后往前调用 outboundHandler 的 read() 方法
pipeline.fireChannelActive();
} else if (config().isAutoRead()) {
// 从后往前调用 outboundHandler 的 read() 方法
beginRead();
}
}
} catch (Throwable t) {
// Close the channel directly to avoid FD leak.
closeForcibly();
closeFuture.setClosed();
safeSetFailure(promise, t);
}
}

这里重点讲一下 pipeline.invokeHandlerAddedIfNeeded() ,这个方法触发了把 BossGroup 最重要的一个 Handler 放到 Pipeline 中。这个过程调用链会比较长,下面只讲主要的。

首先是 callHandlerAddedForAllHandlers() 这个方法,下面是源码:

1
2
3
4
5
6
7
8
9
10
11
12
13
14
15
16
17
private void callHandlerAddedForAllHandlers() {
final PendingHandlerCallback pendingHandlerCallbackHead;
synchronized (this) {
assert !registered;
registered = true;
// 取出之前通道初始化时放在 Pipeline 里的 ChannelInitializer 封装而成的 PendingHandlerCallback
pendingHandlerCallbackHead = this.pendingHandlerCallbackHead;
this.pendingHandlerCallbackHead = null;
}

PendingHandlerCallback task = pendingHandlerCallbackHead;
while (task != null) {
// 执行 ChannelInitializer
task.execute();
task = task.next;
}
}

这个方法主要是调用之前寄存在这里的 ChannelInitializer ,下面是在通道初始化时添加这个 ChannelInitializer 的代码:

1
2
3
4
5
6
7
8
9
10
11
12
13
14
15
16
17
18
19
p.addLast(new ChannelInitializer<Channel>() {
@Override
public void initChannel(final Channel ch) {
final ChannelPipeline pipeline = ch.pipeline();
ChannelHandler handler = config.handler();
if (handler != null) {
pipeline.addLast(handler);
}

ch.eventLoop().execute(new Runnable() {
@Override
public void run() {
// 在 initChannel 方法中添加 ServerBootstrapAcceptor 的 handler
pipeline.addLast(new ServerBootstrapAcceptor(
ch, currentChildGroup, currentChildHandler, currentChildOptions, currentChildAttrs));
}
});
}
});

这个 ChannelInitializer 执行之后会把自己从通道中移除,在方法中调用了另外一个 execute() 方法,由于之前已经创建了 NioEventLoop 线程,不会再去创建新线程了,这里会直接执行里面的 run() 方法。

ServerBootstrapAcceptor 这个类也是一个 Handler ,在连接完成之后负责把建立好连接之后的通道注册到 WorkerGroup 里 NioEventLoop 的 Selector 上。

至此,整个启动流程就到此结束,这个流程已经准备好了 Netty 正常运作所需要的全部参数和组件。下面看看当连接到来时 Netty 是怎么一步步处理的。

处理连接就绪事件

处理连接就绪事件流程如下图所示:

NioEventLoop 里 Selector 检测到连接就绪事件之后会停止阻塞,在事件循环中调用 processSelectorKeys() 方法,中间会经过几次内部调用,下面是其中比较重要的方法:

1
2
3
4
5
6
7
8
9
10
11
12
13
14
15
16
17
18
19
20
21
22
23
24
25
26
27
28
29
30
31
32
33
34
35
36
37
private void processSelectedKey(SelectionKey k, AbstractNioChannel ch) {
final AbstractNioChannel.NioUnsafe unsafe = ch.unsafe();
if (!k.isValid()) {
final EventLoop eventLoop;
try {
eventLoop = ch.eventLoop();
} catch (Throwable ignored) {
return;
}
if (eventLoop == this) {
unsafe.close(unsafe.voidPromise());
}
return;
}

try {
int readyOps = k.readyOps();
if ((readyOps & SelectionKey.OP_CONNECT) != 0) {
int ops = k.interestOps();
ops &= ~SelectionKey.OP_CONNECT;
k.interestOps(ops);

unsafe.finishConnect();
}

if ((readyOps & SelectionKey.OP_WRITE) != 0) {
ch.unsafe().forceFlush();
}
// 如果是连接就绪事件、读就绪事件或值为 0 ,都调用通道的读方法
if ((readyOps & (SelectionKey.OP_READ | SelectionKey.OP_ACCEPT)) != 0 || readyOps == 0) {
// 通道读取数据到 ByteBuf
unsafe.read();
}
} catch (CancelledKeyException ignored) {
unsafe.close(unsafe.voidPromise());
}
}

这个方法为避免原生 Selector 的一些 Bug 作了一些额外的判断,我们主要关注对读写和连接就绪事件的判断。

从最后一个判断可以知道对于连接就绪事件和读就绪事件,后面调用的都是相同的方法 read()。主要是因为处理连接就绪事件的 Channel 类及 NioUnsafe 类与处理读就绪事件的是不一样的,处理连接事件的通道类做的读取其实是通过 accept() 方法获取新的 SocketChannel ,后面传递的”消息”其实就是封装好的 NioSocketChannel。而处理读事件的通道做读取就是从通道读数据,后面传递的参数就是带数据的 ByteBuf。

下面是 read() 方法不同情况的实际调用类:

  • 处理连接就绪事件的通道类:AbstractNioMessageChannel 的内部类 NioMessageUnsafe
  • 处理读就绪事件的通道类:AbstractNioByteChannel 的内部类 NioByteUnsafe

接下来看看这个 read() 方法:

1
2
3
4
5
6
7
8
9
10
11
12
13
14
15
16
17
18
19
20
21
22
23
24
25
26
27
28
29
30
31
32
33
34
35
36
37
38
39
40
41
42
43
44
45
46
47
48
49
50
51
52
53
54
55
56
57
58
59
@Override
public void read() {
assert eventLoop().inEventLoop();
final ChannelConfig config = config();
final ChannelPipeline pipeline = pipeline();
final RecvByteBufAllocator.Handle allocHandle = unsafe().recvBufAllocHandle();
allocHandle.reset(config);

boolean closed = false;
Throwable exception = null;
try {
try {
do {
// 这里会调用原生 serverSocketChannel 的 accept() 并返回一个新的原生 SocketChannel,
// 这个 SocketChannel 会被封装到 NioSocketChannel 中,
// 这里 readBuf 其实是 NioSocketChannel 数组
int localRead = doReadMessages(readBuf);
if (localRead == 0) {
break;
}
if (localRead < 0) {
closed = true;
break;
}

allocHandle.incMessagesRead(localRead);
} while (continueReading(allocHandle));
} catch (Throwable t) {
exception = t;
}

int size = readBuf.size();
for (int i = 0; i < size; i ++) {
readPending = false;
// 从前向后调用 pipeline 里 ChannelHandler 的 channelRead 方法
pipeline.fireChannelRead(readBuf.get(i));
}
readBuf.clear();
allocHandle.readComplete();
// 从前向后调用 pipeline 里 ChannelHandler 的 channelReadComplete 方法
pipeline.fireChannelReadComplete();

if (exception != null) {
closed = closeOnReadError(exception);
pipeline.fireExceptionCaught(exception);
}

if (closed) {
inputShutdown = true;
if (isOpen()) {
close(voidPromise());
}
}
} finally {
if (!readPending && !config.isAutoRead()) {
removeReadOp();
}
}
}

这个方法里 doReadMessages() 主要是调用原生的 accept() 返回一个新的 SocketChannel 并把它封装成 NioSocketChannel 然后放到 ByteBuf 数组中。

下面是 doReadMessages() 源码:

1
2
3
4
5
6
7
8
9
10
11
12
13
14
15
16
17
@Override
protected int doReadMessages(List<Object> buf) throws Exception {
// 通过原生 accept 方法返回一个新的 SocketChannel
SocketChannel ch = SocketUtils.accept(javaChannel());

try {
if (ch != null) {
// 把新的 SocketChannel 封装成 NioSocketChannel 并添加到 ByteBuf 数组中
buf.add(new NioSocketChannel(this, ch));
return 1;
}
} catch (Throwable t) {
...
}

return 0;
}

新的 NioSocketChannel 准备好之后会从前向后依次调用 pipeline 里 ChannelHandler 的 channelRead() ,这其中传递的参数都是这个 NioSocketChannel,调用完成后会依次调用 channelReadComplete() 方法。

这里 Pipeline 首先会调用 HeadContext (也就是 pipeline 队列的头节点)的 channelRead 方法,HeadContext 不会做任何处理,直接调用它的下一个节点的 ChannelHandler 来处理,这里下一个节点的 ChannelHandler 就是 ServerBootstrapAcceptor ,这个类就是处理连接就绪事件的。

下面是 ServerBootstrapAcceptor 的 channelRead() 方法:

1
2
3
4
5
6
7
8
9
10
11
12
13
14
15
16
17
18
19
20
21
22
23
24
@Override
@SuppressWarnings("unchecked")
public void channelRead(ChannelHandlerContext ctx, Object msg) {
final Channel child = (Channel) msg;
// 把自定义的 ChannelInitializer 添加到新通道对应的 pipeline 中
child.pipeline().addLast(childHandler);
// 配置通道
setChannelOptions(child, childOptions, logger);
setAttributes(child, childAttrs);

try {
// 把通道注册到 WorkerGroup 里 NioEventLoop 对应的 Selector 上
childGroup.register(child).addListener(new ChannelFutureListener() {
@Override
public void operationComplete(ChannelFuture future) throws Exception {
if (!future.isSuccess()) {
forceClose(child, future.cause());
}
}
});
} catch (Throwable t) {
forceClose(child, t);
}
}

这个方法其实就是做新通道的初始化和注册,后面的流程与启动流程是一样的,只是被注册的对象变成了 WokerGroup 里 NioEventLoop 对应的 Selector 。

处理读就绪事件

下面是处理读就绪事件的流程时序图:

处理读就绪事件与处理连接就绪事件类似,差异就在于数据读取和最后调用的 Handler 上。

下面是读就绪事件的 read() 源码,该方法在 AbstractNioByteChannel 的内部类 NioByteUnsafe 中:

1
2
3
4
5
6
7
8
9
10
11
12
13
14
15
16
17
18
19
20
21
22
23
24
25
26
27
28
29
30
31
32
33
34
35
36
37
38
39
40
41
@Override
public final void read() {
...
try {
do {
// 以初始值 2048 或与前面读取的数据长度比较后的值作为容量创建一个 ByteBuf
byteBuf = allocHandle.allocate(allocator);
System.out.println("byteBuf capacity: " + byteBuf.capacity());
// 读取 byte 数据并统计读取到的字节数
allocHandle.lastBytesRead(doReadBytes(byteBuf));
if (allocHandle.lastBytesRead() <= 0) {
byteBuf.release();
byteBuf = null;
close = allocHandle.lastBytesRead() < 0;
if (close) {
readPending = false;
}
break;
}

allocHandle.incMessagesRead(1);
readPending = false;
// 从前向后调用 pipeline 里 handler 的 channelRead()
pipeline.fireChannelRead(byteBuf);
byteBuf = null;
} while (allocHandle.continueReading());

allocHandle.readComplete();
// // 从前向后调用 pipeline 里 handler 的 channelReadComplete()
pipeline.fireChannelReadComplete();

if (close) {
closeOnRead(pipeline);
}
} catch (Throwable t) {
handleReadException(pipeline, byteBuf, t, close, allocHandle);
} finally {
...
}
}
}

这里有几个点需要注意一下:byteBuf = allocHandle.allocate(allocator) 这里 ByteBuf 容量大小不是一个固定值,是根据当前处理数据量动态计算的;allocHandle.lastBytesRead(doReadBytes(byteBuf)) 这里读取数据的同时做了一些统计工作,方便确定下一次读取数据的最大值。后面的处理与连接就绪事件是一样的,这里就不赘述了。

处理消息出站

消息出站分两种,一种是 ChannelHandlerContext 调用的 writeAndFlush() ,一种是 Channel 或 Pipeline 调用的 writeAndFlush()

下图是 Channel 或 Pipeline 调用的 writeAndFlush() 流程:

下图是 ChannelHandlerContext 调用的 writeAndFlush() 流程:

这两种写出的方式差别就在于调用 writeAndFlush() 后执行的下一个节点不同。

  • Channel 调用写出方法,它内部人会执行 Pipeline 的 writeAndFlush() 方法,Pipeline 内部会执行直接让尾节点继续执行这个方法,并一直向前面的 OutboundHandler 节点传递;
  • ChannelHandlerContext 调用写出方法,它内部会调用这个节点的下一个 OutboundHandler 节点。

在 ChannelHandlerContext 的父类 AbstractChannelHandlerContext 中会把 writeAndFlush() 方法拆分为两个方法:invokeWrite0()invokeFlush0() ,下面是源码:

1
2
3
4
5
6
7
8
9
10
void invokeWriteAndFlush(Object msg, ChannelPromise promise) {
if (invokeHandler()) {
// 触发 write() 调用链
invokeWrite0(msg, promise);
// 触发 flush() 调用链
invokeFlush0();
} else {
writeAndFlush(msg, promise);
}
}

从上面的图中也可以看出来这两个方法会触发不同的调用链,而且是 write() 调用链全部执行完成之后才会触发 flush() 调用链的执行。

下面分别讲讲这两条调用链的终点方法。

首先讲一下 AbstractChannel 内部类 AbstractUnsafe 的 write() 方法,下面是源码:

1
2
3
4
5
6
7
8
9
10
11
12
13
14
15
16
17
18
19
20
21
22
23
24
25
26
27
28
29
30
31
32
33
@Override
public final void write(Object msg, ChannelPromise promise) {
assertEventLoop();

ChannelOutboundBuffer outboundBuffer = this.outboundBuffer;
if (outboundBuffer == null) {
try {
ReferenceCountUtil.release(msg);
} finally {
safeSetFailure(promise,
newClosedChannelException(initialCloseCause, "write(Object, ChannelPromise)"));
}
return;
}

int size;
try {
msg = filterOutboundMessage(msg);
size = pipeline.estimatorHandle().size(msg);
if (size < 0) {
size = 0;
}
} catch (Throwable t) {
try {
ReferenceCountUtil.release(msg);
} finally {
safeSetFailure(promise, t);
}
return;
}
// 把要写出的数据信息封装成 Entry 放在队列尾部
outboundBuffer.addMessage(msg, size, promise);
}

这个方法看着代码挺多,其实最重要的就是最后一句,下面是 addMessage() 的源码:

1
2
3
4
5
6
7
8
9
10
11
12
13
14
15
16
17
public void addMessage(Object msg, int size, ChannelPromise promise) {
Entry entry = Entry.newInstance(msg, size, total(msg), promise);
if (tailEntry == null) {
flushedEntry = null;
} else {
Entry tail = tailEntry;
tail.next = entry;
}
tailEntry = entry;
if (unflushedEntry == null) {
unflushedEntry = entry;
}

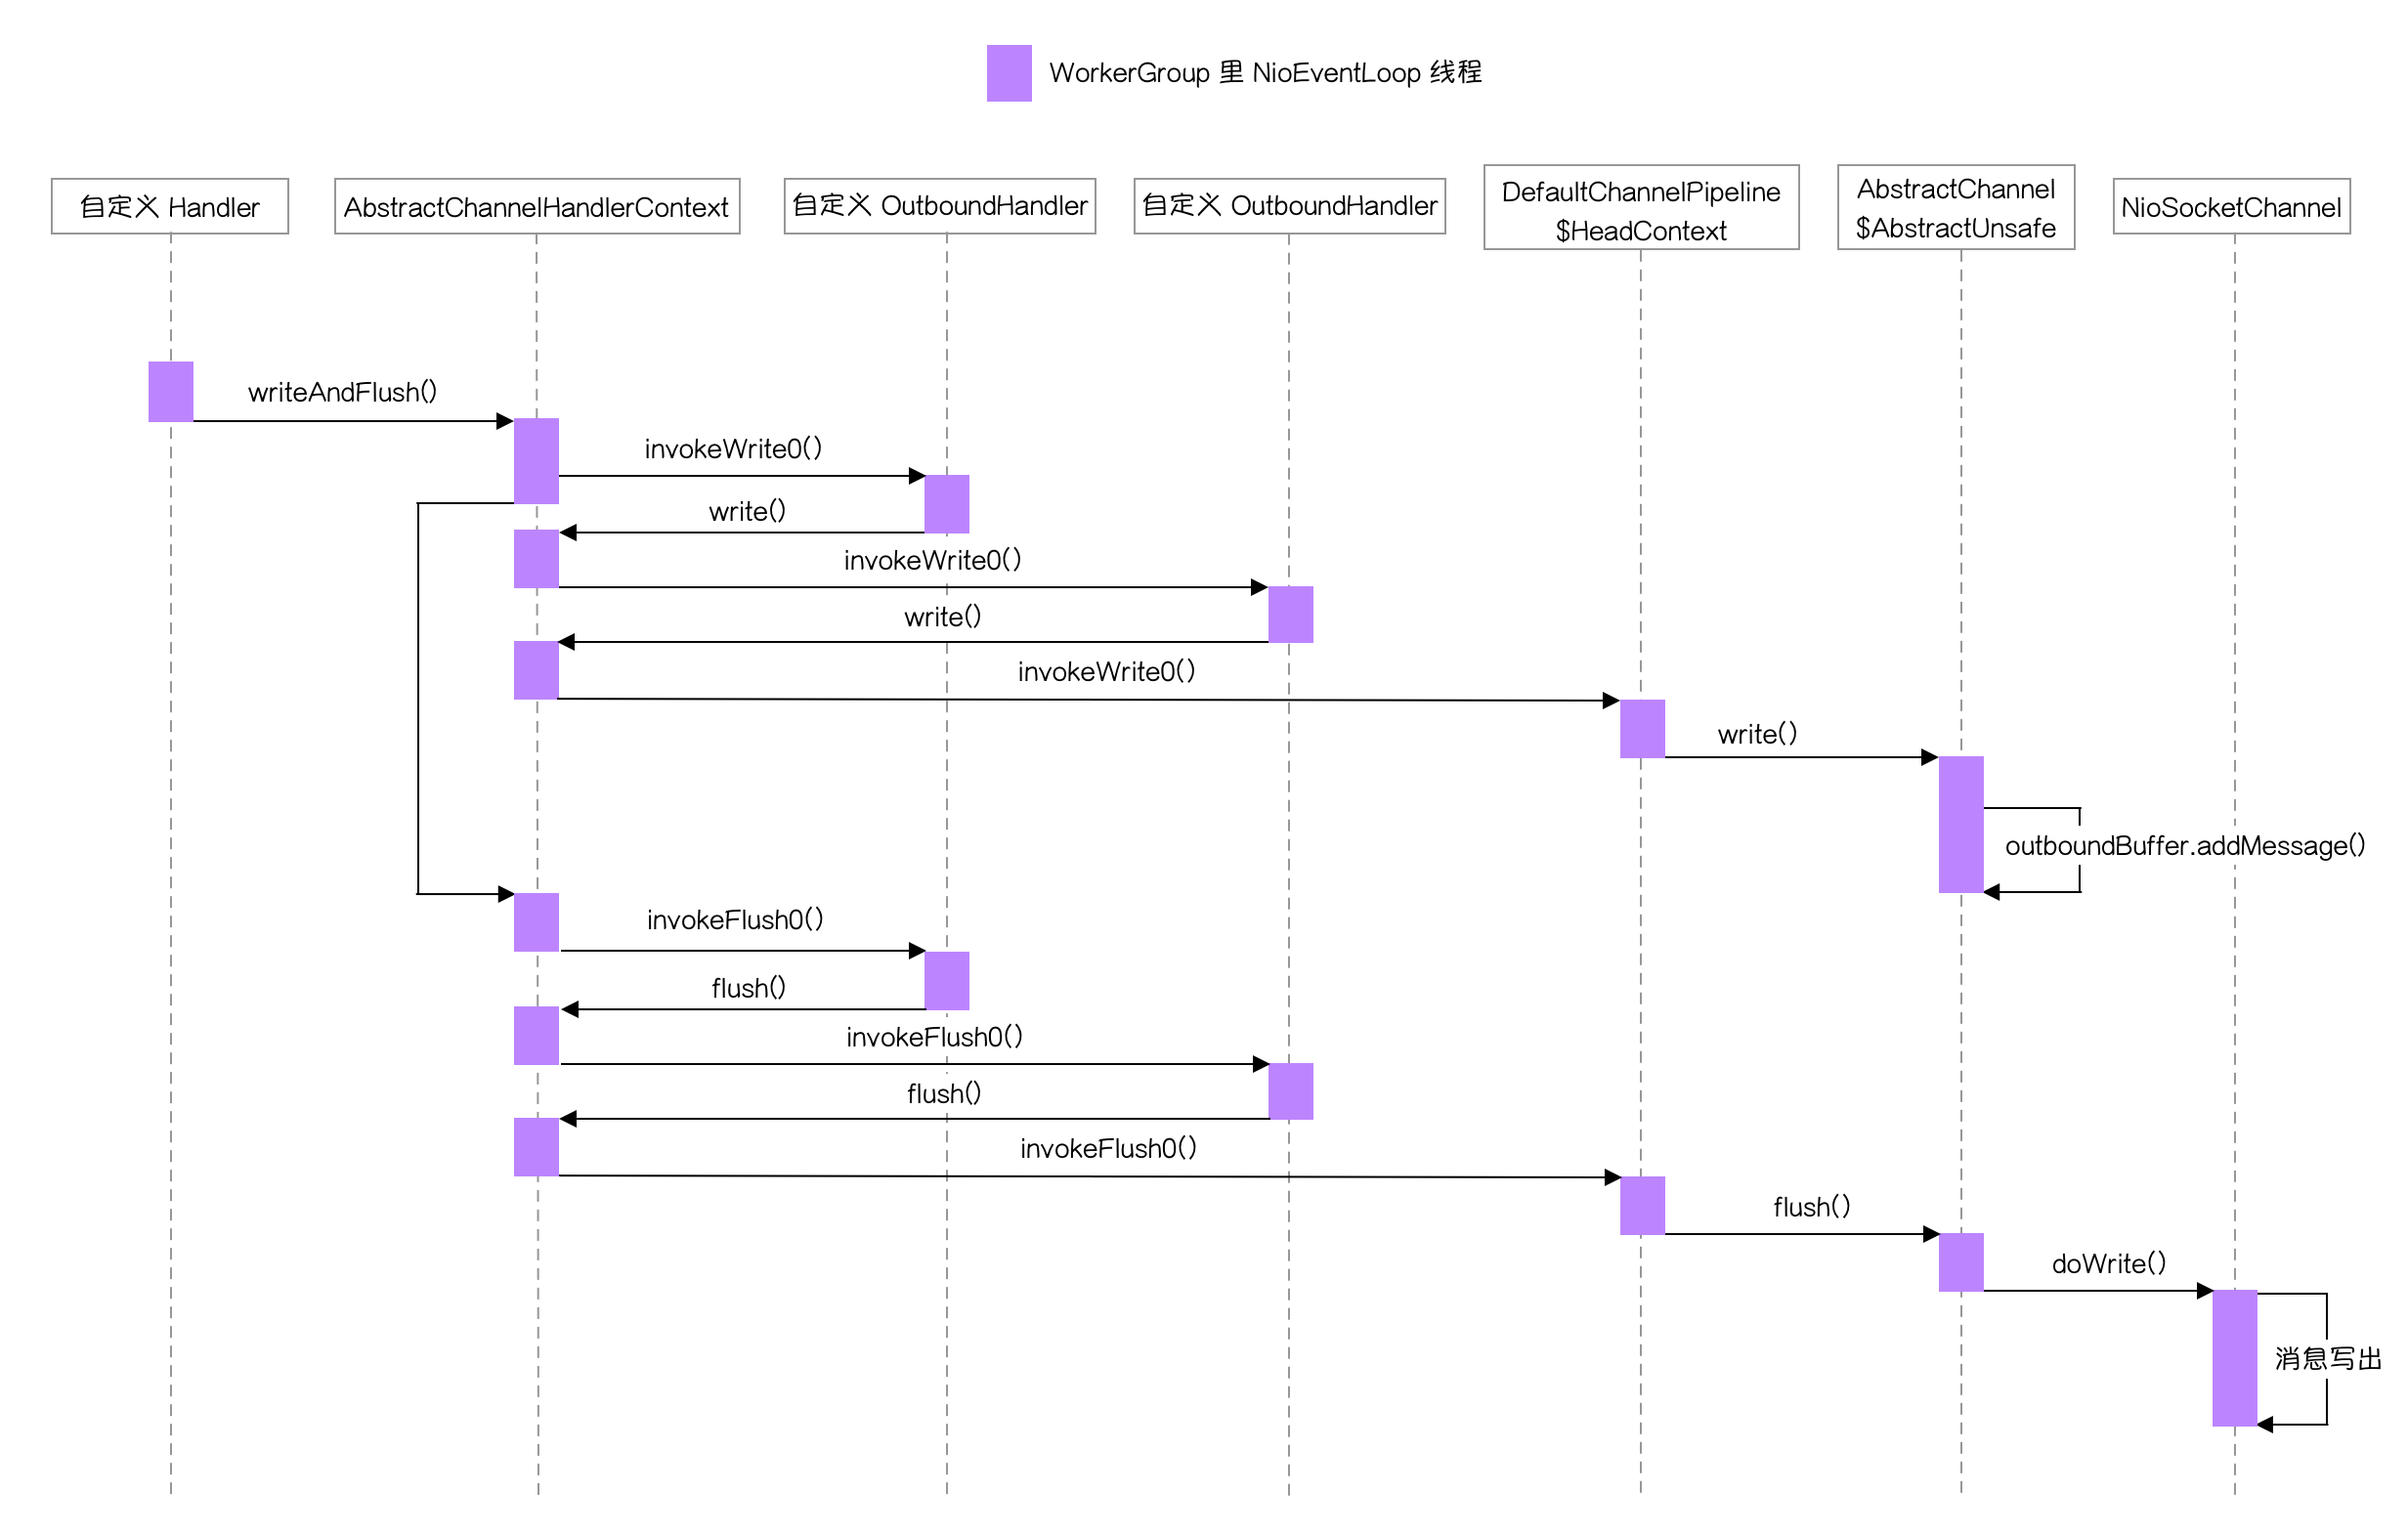
// increment pending bytes after adding message to the unflushed arrays.
// See https://github.com/netty/netty/issues/1619
incrementPendingOutboundBytes(entry.pendingSize, false);
}

这个方法不难理解,就是把消息封装成 Entry 对象,然后放到队列的尾部。

接着上看一下 invokeFlush0() 调用链的终点 NioSocketChannel 的 doWrite() ,下面是源码:

1
2
3
4
5
6
7
8
9
10
11
12
13
14
15
16
17
18
19
20
21
22
23
24
25
26
27
28
29
30
31
32
33
34
35
36
37
38
39
40
41
42
43
44
45
46
47
48
49
50
51
52
53
54
55
56
@Override
protected void doWrite(ChannelOutboundBuffer in) throws Exception {
SocketChannel ch = javaChannel();
int writeSpinCount = config().getWriteSpinCount();
do {
if (in.isEmpty()) {
clearOpWrite();
return;
}

int maxBytesPerGatheringWrite = ((NioSocketChannelConfig) config).getMaxBytesPerGatheringWrite();
ByteBuffer[] nioBuffers = in.nioBuffers(1024, maxBytesPerGatheringWrite);
int nioBufferCnt = in.nioBufferCount();

switch (nioBufferCnt) {
case 0:
// We have something else beside ByteBuffers to write so fallback to normal writes.
writeSpinCount -= doWrite0(in);
break;
case 1: {
// Only one ByteBuf so use non-gathering write
// Zero length buffers are not added to nioBuffers by ChannelOutboundBuffer, so there is no need
// to check if the total size of all the buffers is non-zero.
ByteBuffer buffer = nioBuffers[0];
int attemptedBytes = buffer.remaining();
final int localWrittenBytes = ch.write(buffer);
if (localWrittenBytes <= 0) {
incompleteWrite(true);
return;
}
adjustMaxBytesPerGatheringWrite(attemptedBytes, localWrittenBytes, maxBytesPerGatheringWrite);
in.removeBytes(localWrittenBytes);
--writeSpinCount;
break;
}
default: {
// Zero length buffers are not added to nioBuffers by ChannelOutboundBuffer, so there is no need
// to check if the total size of all the buffers is non-zero.
// We limit the max amount to int above so cast is safe
long attemptedBytes = in.nioBufferSize();
final long localWrittenBytes = ch.write(nioBuffers, 0, nioBufferCnt);
if (localWrittenBytes <= 0) {
incompleteWrite(true);
return;
}
adjustMaxBytesPerGatheringWrite((int) attemptedBytes, (int) localWrittenBytes,
maxBytesPerGatheringWrite);
in.removeBytes(localWrittenBytes);
--writeSpinCount;
break;
}
}
} while (writeSpinCount > 0);

incompleteWrite(writeSpinCount < 0);
}

这个方法的代码也非常多,但源码的注释也非常详细,核心是上面带英文注释的三块代码,也对应三种不同的数据写出情况。

下面是 nioBufferCount 不同取值的处理:

  • 值为 0 ,代表当前还不能写出数据,还有 write() 操作没有执行完,继续回去执行 write()
  • 值为 1,直接写出
  • 值为其他,批量写出

从注释可以知道,长度为 0 的 buffer 是不会被 ChannelOutboundBuffer 添加到 nioBuffers 中的。所以这里都没有判断 buffer 长度是否为 0。

总结

以上就是 Netty 源码剖析的全部内容。可以看出来整个源码最复杂的其实是启动流程,启动流程弄清楚了其他的事件处理相对来说理解起来就会比较容易。